 zabloo
Getting started
Build a shop screen from an empty folder, connect it to the game's data, and load it into Unity. About twenty minutes, and nothing installs into an engine until the last step.
The screen below is what you are building: a guild shop, with a gold counter the game keeps updated and a list of items whose Buy buttons the game hears. You build all of it here, one step at a time, and the last step puts it inside a running Unity project.
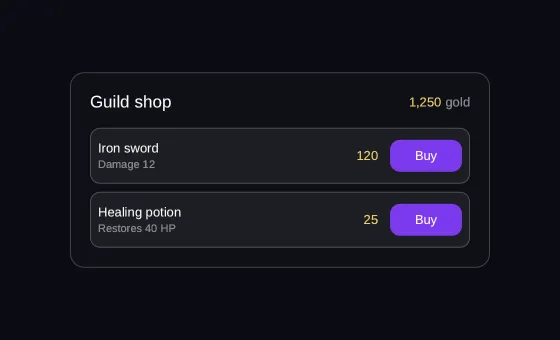
Everything up to step 6 runs in the browser — no engine, no account, no key. The rest of these docs are the reference; this page is the one that builds something, and it links out whenever a topic has a page of its own.
Before you start
- Node 22 or newer, and pnpm
- A Unity project (2022.3 LTS or newer), only if you want to finish step 6
- No account, no key, no quota
1 Scaffold and first run
One command creates the project, one starts the preview:
npx create-zabloo-app my-game-ui
cd my-game-ui
pnpm install
pnpm dev
npx runs the project generator once without installing it; from then on the
project is yours and pnpm is what drives it. Any package manager works — the
docs say pnpm throughout so there is one thing to copy.
Open http://localhost:5078. You are looking at the scaffolded main-menu
view, drawn by
@zabloo/renderer-web. That is the same drawing code the in-game SDK runs: it
measures the text, works out where every box goes and paints the result itself.
No part of the browser is doing the layout, and there is no HTML inside that
canvas — so what you see is what the game will draw.
Three parts of the preview earn their keep straight away:
- The view selector. Every
.tsxinsrc/views/is a view, and the filename is the id the SDK loads it by. - The bindings panel. It discovers every bound path in the envelope and gives you a typed field per path. This is you, playing the role of the game.
- The actions console. Every named action the UI fires, as the game would receive it.
The project itself is four folders:
my-game-ui/
├── src/
│   ├── views/        one .tsx per view — the filename is the view id
│   ├── components/   your React components (they never reach the IR)
│   ├── assets/       images; the export inlines them in the envelope
│   └── theme.ts      tokens, variants and motion
├── zabloo.config.ts
└── package.json      dev · dev:unity · build
What you have now: a working project, and a preview that draws it with the same code the game will use.
2 Your first screen
Open src/views/main-menu.tsx and replace it with something small enough to
own every line of:
import { Column, Text } from "@zabloo/react";

export default function MainMenu() {
  return (
    <Column layout={{ grow: 1, justify: "center", align: "center", gap: 16 }}>
      <Text style={{ color: "#eceff4", fontSize: 28 }}>Guild shop</Text>
    </Column>
  );
}
Save. The preview re-exports and reloads on its own — that is pnpm dev
watching.
It is JSX, and the elements are nodes of the format. There is no DOM underneath, and no engine widget either.
Your .tsx runs once, at authoring time, and its output is data.
zabloo export executes your components on your machine and writes an
envelope: one JSON file
describing a tree of nodes, their styles and the hooks they declare. The game
never runs React, never runs JavaScript, and never sees MainMenu.
Because the JSON is the end of the line, the React habits that depend on a
running app do not carry over. There is no useState and nothing re-renders
once the game is running. onClick takes a name rather than a function,
since a function cannot be written into a JSON file. And a condition like
gold > 0 && is answered once, while exporting, and then frozen. Everything
that happens before the JSON exists — .map(), props, helper functions,
splitting things into components — works exactly as you expect.
So a zabloo UI does its changing through two declared hooks instead, and the next two steps are those hooks.
What you have now: your own screen on the canvas, and the one rule the rest of the tutorial builds on — your code runs at build time, and data is what ships.
3 Data: bindings
The game owns the data. The UI only declares where to read it. A
binding is a path into that data,
like player.gold: the UI never holds the number, it reads whatever the game
has there, and re-lays out when that number moves.
Add a gold counter: a <Text> with bind instead of children.
<Row layout={{ justify: "space-between", align: "center" }}>
  <Text style={{ color: "#eceff4", fontSize: 28 }}>Guild shop</Text>
  <Text bind="player.gold" style={{ color: "#facc15", fontSize: 20 }} />
</Row>
Save, and look at the preview’s bindings panel: player.gold appeared on its
own, with a number field beside it. Type 1250 into it. The text fills in and
the row re-lays out around its new width.
bind on <Text> is shorthand. Every other bindable prop takes the object
form — a literal value or { bind: "path" }:
<Text visible={{ bind: "shop.thanked" }} style={{ color: "#4ade80" }}>
  Thanks for your purchase
</Text>
A path is a dot-separated address into the game’s data, where a numeric
segment indexes an array: player.gold, shop.items.3.name. Reading never
throws — a missing path renders nothing rather than breaking the frame. The
same channel has three doors: the preview’s bindings panel, zabloo.setData()
in the browser console, and SetData from the game in step 6.
Two limits are worth internalizing now, because they are deliberate:
- No expressions. No arithmetic, no formatting, no conditionals. A value is shown as it is; anything that needs deciding is decided by the game, which then moves a value the UI is bound to.
styleis not bindable. A bar that turns red when it is low is done by the game moving a token, not by the UI computing a color.
What you have now: a screen that reads live numbers out of the game. Next, the same connection in the other direction.
4 Actions, and a list
A named action is a string the game chose. The envelope declares that the hook exists; what happens is never in the JSON — which is exactly what lets the screen be replaced without touching the build.
The interesting case is not one button. It is a button inside a data-driven
list, where the same "buy" has to say which row was pressed. <List>
emits its item template once and the SDK instantiates it per element of the
bound array:
<List
  items="shop.items"
  as="it"
  keyPath="id"
  layout={{ gap: 8, align: "stretch" }}
  empty={<Text style={{ color: "#8a8a93" }}>Nothing in stock yet</Text>}
>
  {(it) => (
    <Row layout={{ height: 56, padding: 8, gap: 12, align: "center" }}>
      <Column layout={{ grow: 1, gap: 2 }}>
        <Text bind={it("name")} style={{ color: "#eceff4", fontSize: 13 }} />
        <Text bind={it("detail")} style={{ color: "#8a8a93", fontSize: 11 }} />
      </Column>
      <Text bind={it("price")} style={{ color: "#facc15", fontSize: 13 }} />
      <Button variant="primary" onClick="buy" layout={{ width: 72, height: 32 }}>
        <Text style={{ color: "#ffffff", fontSize: 13 }}>Buy</Text>
      </Button>
    </Row>
  )}
</List>
Four things in that snippet:
as="it"names the item alias. Inside the template,it("name")is the pathit.nameresolved against the current element; a path under no alias stays absolute, which is how a row can still bindplayer.gold.keyPath="id"is the item’s stable identity. It keeps per-item runtime state — the focus ring, an in-flight transition — with its item when the game reorders the array. It iskeyPathand notkeybecause React ownskey.emptyis a slot, not a condition. The IR has no expressions, so “nothing here yet” is a node the SDK shows when the array is empty.- The template is a single node, because the primitive’s first child is the template.
Here is that screen, running. It is not a picture of the UI — press Run and the same envelope this project exports is mounted by the same renderer, in your browser:
Feed the list the way the game will, from the browser console:
zabloo.setData("shop.items", [
  { id: "sword", name: "Iron sword", detail: "Damage 12", price: "120" },
  { id: "potion", name: "Healing potion", detail: "Restores 40 HP", price: "25" },
]);
Press Buy on a row and watch the preview’s actions console:
buy → shop.items.0 (#0)
That suffix is the action context: an action fired from inside a repeated item carries the item’s absolute path, its index, and its key when the list declares one. Because the path embeds every enclosing index, nested lists work from the innermost item alone.
What you have now: the shop screen at the top of this page, working in both directions — the game feeds the list, and the list tells the game which row was pressed.
5 Theme and variants
The screen works and is full of hex codes. They belong in src/theme.ts, which
already ships every token this screen needs:
export const tokens = {
  "color.primary": "#7c3aed",
  "color.surface": "#0e1016",
  "color.text": "#ffffff",
  "color.muted": "#a1a1aa",
  "color.gold": "#fcd34d",
  "radius.md": 10,
  "space.2": 8,
  // Motion is a token like any other.
  "motion.fast": 120,
};
A token is a named value the whole
UI shares, and a token reference is how a style points at one: a string in
braces, "{color.gold}" in place of "#fcd34d", "{space.2}" in place of
8. Styles do not bake values — the SDK
resolves references per node at render time against the envelope’s flat
dictionary, which is why swapping that dictionary re-themes the whole UI
without re-emitting the tree. Set motion.fast to 0 and the UI stops
animating; nothing else changes.
A variant is a named style set with its own interaction states:
export const variants: ThemeVariants = {
  Button: {
    primary: {
      style: { background: "{color.primary}", radius: "{radius.md}" },
      states: {
        hover: { style: { background: "#8b5cf6" } },
        pressed: { style: { background: "#6d28d9" } },
        focused: { style: { borderWidth: 2, borderColor: "#8b5cf6" } },
        disabled: { style: { opacity: 0.45 } },
      },
    },
  },
};
Hover it, tab to it — the states are the SDK’s, keyed by node type, with no game code:
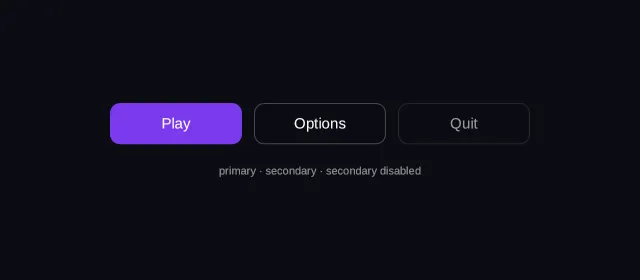
Unlike a token, a variant never reaches the IR: @zabloo/react resolves it
at export time, so the emitted Button carries the flattened style and states
outright and the word primary appears nowhere in the envelope. Variants are an
authoring convenience; tokens are a runtime indirection. That is also why they
are keyed by primitive — <Checkbox> and <Switch> both look under
Toggle, because that is what they lower to.
What you have now: the same screen with no hex codes in it, and a theme the game can swap whole without you re-exporting anything.
6 Export and load it in the game
pnpm build
One file comes out, dist/zabloo.ir.json, and it is the whole deliverable:
{
  "v": 1,                                  // IR major version
  "tokens": { "color.gold": "#fcd34d" },   // the flat dictionary
  "views": { "main-menu": { "type": "Container" } },
  "assets": { "logo.png": { "hash": "…", "data": "iVBOR…" } }
}
From here on, that file is the UI. Ship it inside the build or fetch it at runtime — same loading path either way. An SDK refuses a major version it does not implement, and degrades anything newer inside one it does.
Unity
The SDK ships as a UPM package, com.zabloo.sdk. Add it to
Packages/manifest.json, then, in the scene:
- Add a
ZablooDocumentto a GameObject. It requires aUIDocumentand adds one. - Drop
dist/zabloo.ir.jsonintoAssets/and assign the importedTextAssetto the document’s Envelope field. - Set View to the view id you want —
main-menu.
The game talks to the UI through the document, which is the stable handle: the view is disposable and gets swapped on every reload, while subscriptions survive and pushed data is replayed.
using UnityEngine;
using Zabloo;

[RequireComponent(typeof(ZablooDocument))]
public sealed class ShopDriver : MonoBehaviour
{
    [SerializeField] int _gold = 1250;

    ZablooDocument _doc;

    // Start, not OnEnable: it runs after ZablooDocument has built the view.
    void Start()
    {
        _doc = GetComponent<ZablooDocument>();
        _doc.OnAction += OnZablooAction;
        _doc.SetData("player.gold", _gold);
    }

    void OnDestroy()
    {
        if (_doc != null) _doc.OnAction -= OnZablooAction;
    }

    void OnZablooAction(string action)
    {
        if (action != "buy") return;
        _gold -= 100;
        _doc.SetData("player.gold", _gold);   // the bound Text re-lays out
        _doc.SetData("shop.thanked", true);   // `visible` reveals the row
    }
}
SetData is cached on the document, so a value pushed before the view exists —
or before a bound node does — applies as soon as it does.
The package is not published to a registry yet: add it by local path or git
URL. And OnAction is an Action<string> — it delivers the action name
only, so the item context of step 4 is not in C# yet. Until it is, a game that
needs to know which row was pressed reads the selection from its own state.
You do not have to re-export and re-import by hand while you work. Enable
Zabloo → Dev Mode in the Unity editor and run pnpm dev:unity: every save
hot-swaps the running view in the editor, Play mode included, through the exact
loading path a production
hot-update uses.
What you have now: the finished screen running inside the game, driven by game state — and one file you can replace later without shipping a new build.